
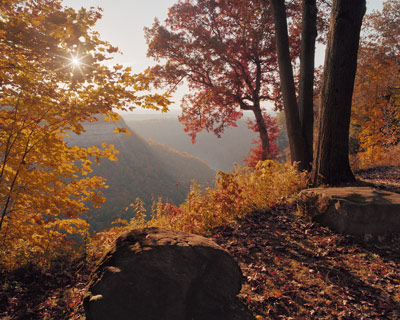
Home
Current Show
Show Schedule
Gallery Partners
Artists-in-Residence
Exhibition Opportunities
Links Courses and Workshops
Sponsors
Newsletter Archive
Gary's Photographic Tips
Informative
Videos Join us on
Facebook 
Gallery Location
Google Map MapQuest Map Yahoo Map
| | Gary Thompson's Photo Tips In the Tip of the Month Gary
Thompson, Gallery Partner
shares his special tips to help all of us take better pictures.
Check back each month for more examples.
All photographs copyright Gary Thompson or Phyllis Thompson.
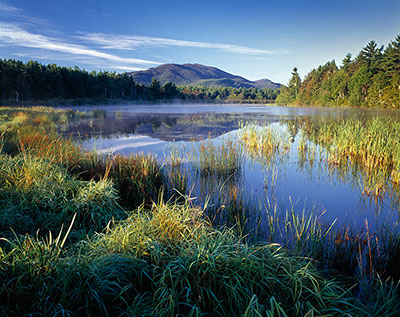 |
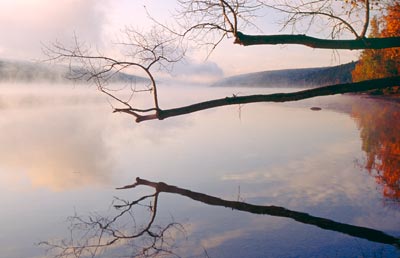
March 2016
Foregrounds during Sunrises and
Sunsets
A high percentage of successful landscapes have
three components: a foreground, a middle ground, and a background.
Foreground is the most important element for communicating depth in
photographs. During sunrises and sunsets interesting foregrounds are
difficult to achieve because they are usually backlit and often dark
when shooting directly into the sun. Like in last month’s photo tip, a
photographer shooting at approximately a right angle to the sun can use
attractive side lighting to bring out the beauty of a sunrise or sunset.
My Lake Everest Sunrise photograph was
actually captured about thirty minutes after the sunrise. At that moment
in time it was the “play of light” on the foreground that most attracted
me to shoot the photograph. I found that my best composition and best
side lighting occurred when I set my camera at about 110 degrees from
the rising sun. Although the reflections of the mountain in the lake and
the clouds in the sky were attractive, it was the “play of light” on the
grasses and reeds that I found most interesting emotionally.
Therefore, I emphasized the foreground by making it about
two/thirds of the overall scene.
Note that the far side of the lake acts as the
middle ground, and the attractive clouds over the mountain provide the
background. By emphasizing the play of light on the foreground and then
also including the middle and back-grounds, a feeling of depth is
communicated. The beauty of the “play of light” provides the emotional
impact that separates it from more traditional sunrise images.
|
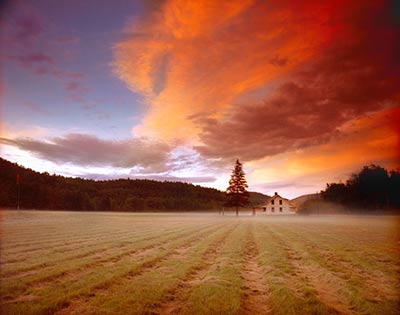 |
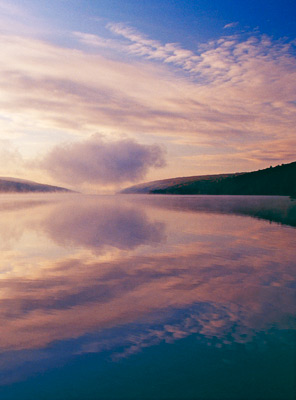
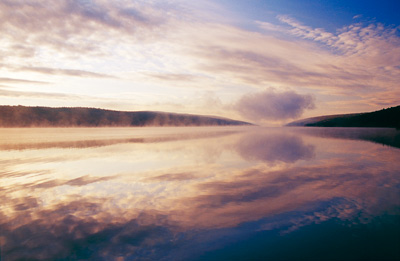
February 2016
Clouds in Sunsets or Sunrises
Keene Valley Sunset
Photographers very often
include the sun breaking over the horizon or the sun bursting through
picturesque tree canopies when photographing sunrises or sunsets.
These compositional techniques are very effective and often produce
beautifully dramatic images. I very often use these approaches
when photographing sunrises and sunsets.
When
dramatic cloud patterns are present at right angles to the sun an
equally beautiful image can sometimes be captured without the direct
presence of the sun. This is the case in my image of an autumn
sunset in the Keene Valley area of the Adirondack Mountains of New York
State. I was first attracted to this location by a heavy fog that had
settled over a grassy field containing a picturesque white building.
When the fog rose and the area began to clear a very large thick cloud
formed leading me to believe that a heavy dull sunset would take place.
Instead the cloud broke into attractive patterns while taking on
brilliant red colors. The most beautiful patterns were
actually at a right angle from the setting sun and it was relatively
easy to capture this photograph using a three-stop ND gradient filter,
over a polarized filter on the front of my moderately wide angle lens.
An advantage of shooting at right angles to a sunrise or sunset is that
often the components of the image are fairly evenly illuminated and very
little or no post processing is required.
|
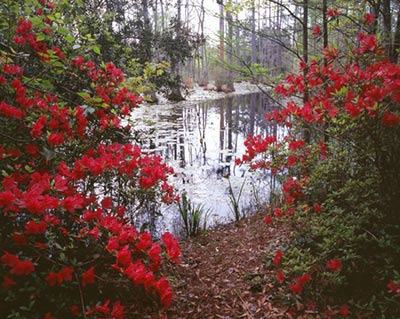 |
January 2016
Windows of Opportunity
Cyprus Swamp Window
An effective way to communicate three dimensional
feelings when photographing in densely wooded areas is to utilize
openings. Look for
situations where you can frame subject matter within spaces of
interesting close substances.
Think of framing as a type of foreground and compose your image
within that foreground. By moving
in closer or moving further back from an opening the photographer can
adjust the size of the opening and the amount of subject matter that is
framed. By moving left or
right, or by moving up or down the photographers can adjust the
perspective of the framed subject matter.
While walking the trails of a cypress swamp I noticed two brilliantly
colored azalea bushes at the edge of the swamp.
By moving in closer I was able to frame the swamp between the
bushes and then compose my photograph Cypress Swamp Window.
This photograph is an example of
a recognized “Window of Opportunity” in that the azaleas were at peak
bloom and also that the available light was soft and diffused.
Notice that the ground between the bushes was used to further
complete the framing of the window.
By shooting at an angle the ground forms a diagonal border for
the image. This pleasantly parallels the line of the vegetation on the
far side of the swamp.
|
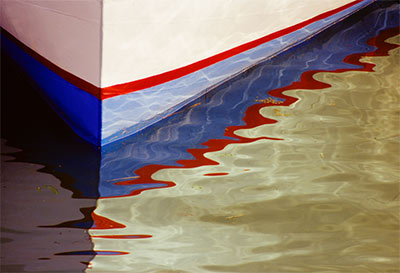 |
December 2015
Adjust to the Conditions
Red, White, and Blue
Even when we carefully study predicted weather
conditions and make appropriate plans for using those conditions to make
good images, sometimes Mother Nature throws a curve ball into the mix.
This is what happened to me one morning at Bar Harbor, Maine when I was
anticipating a glorious sunrise. Based upon weather reports I was
visualizing a dramatic sky with colorful light percolating through
backlit clouds. Instead, the skies
became bald and the resulting direct light was harsh.
With some disappointment I turned my back to the
direct light and happened to notice a few brightly lit boats tied up to
the wharf about 180 degrees from the sunrise.
I wandered over to the boats and spotted several colorful
reflections in the water.
Using my 100 – 400 zoom lens, I began to isolate various combinations of
minimalistic patterns created by the edges of the boats and their
reflections. Using different long
focal lengths I was able to make a good variety of semi-abstract
photographs. My example image is
titled Red, White, and Blue. Later,
feeling great about our adjustment to the conditions, Phyllis and I
enjoyed a wonderful breakfast at Jordan’s in downtown Bar Harbor.
|
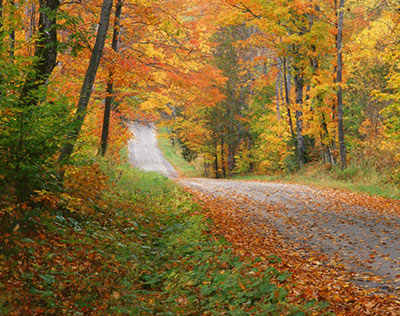 |
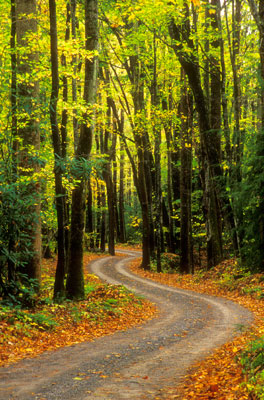
November 2015
Diagonal
Orientation for Roadway Images
Autumn in Vermont
All of us have observed photographs of picturesque
roadways where a road evenly dissects the image by starting and
traveling directly through the center of the image. While an image
might be technically sound this centered approach usually is too
symmetrical and perhaps a little boring.
After experiencing disappointing images using a
head on orientation, I have learned to position myself and my camera off
to one side of a road in order to create a diagonal axis for roadways.
Using this approach in my example image, Autumn in Vermont, an
overall aesthetic flow pattern is established. Although the road in this
image runs basically down hill, notice that there is a slight ridge
before the road drops more steeply. At this point the viewable side
portion of the road narrows very significantly before widening again as
it climbs the hill into the background. Using a little imagination you
may visualize the road as resembling a ribbon that is twisted at its
narrowest point. This narrowing and twisting appearance was a bonus for
the diagonal viewpoint and a main motivator for me when composing this
image.
|
 |
October 2015
Creativity at Cliché Locations
Autumn
Leaves at Glade Creek Mill’
How does one make high quality, unique images at great photogenic
locations that have been extensively photographed?
We have all visited these picturesque places and have attempted to make
unique and meaningful pictures only to realize that, while we thought
that we had achieved a great image, what we recorded was just another
very good photograph of a commonly recognized place. It then is
disheartening to hear comments about our photograph as being a “cliché
image”. The reality is that
photographing at these common locations presents an immense challenge.
If the greatest magic light that ever occurred at a given spot is
present, an excellent photographer might produce a truly superb image.
However, being present for this once in a lifetime light is
infinitely unlikely.
An approach that is more likely to succeed is to thoroughly study the
subject’s surroundings to find unique compositions for presenting the
subject. My example image was made at Glade Creek Mill in West Virginia,
which is probably the second most photographed mill in the eastern U.S. A
steady rain provided beautifully soft, overcast lighting. By
moving in extremely close -about 6 inches -
from the leaves on a large slanting rock, the image was made with
a 17- 35 mm lens, at
f/22,
focusing on the second closest leaf.
By adjusting the polarizer the amount of glare on the leaves and
wet rocks was reduced. An unique image of the Mill was achieved by
making the foreground about 40 percent of the total photograph.
Perhaps, another photographer might utilize a similar
composition, but the specific leaves and their precise pattern will
never occur again.
|
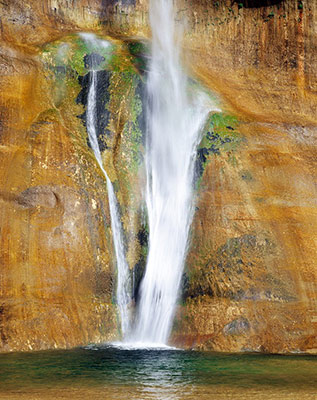 |
September 2015
Look for Images
wiithin Images
Calf Creek Falls
It has been about three years since I stopped writing Photo Tips of the
month for placement in the Image City Photography Gallery’s Newsletter.
Friends and fellow photographers have been urging me to renew
these tidbits of my personal experiences so I have decided to start
writing the Tips of the Month again.
Often when reviewing images with my students and when doing portfolio
reviews at Image City, I start seeing smaller images within the
compositions of larger images.
Sometimes these smaller component images are individually more powerful
and interesting than the overall image.
This is particularly the case with landscape photographs.
There is a natural tendency to include several interesting
mini-compositions within the overall landscape believing that the
cumulative effect will proportionally improve the overall photograph.
The opposite is generally true.
The reality is that more is usually less, and less is usually
more. Most of us have been down
this road many times. The
tendency to include too many interesting things within our photographs
is tough to resist.
One method to combat this over-inclusion that works reasonably well for
me, is to continually ask myself, “what is the most interesting part of
my composition”. If a specific area stands out as the most interesting,
then I know that an image of that specific area is likely to produce a
simpler but higher quality photograph.
Calf Creek Falls in Utah is a very tall, narrow falls with a
beautiful plunge basin surrounded by a circular pristine sand beach
containing attractive willow trees.
After capturing several photographs using a variety of
compositions I came to the conclusion that the most interesting
sub-composition was the lower 25% of the falls with its spray and
beautifully colored patterns. I
isolated this section of the falls with a telephoto lens and eliminated
foreground to emphasize colors and patterns. This produced a more
dramatic and unique photographic version of Calf Creek Falls.
| 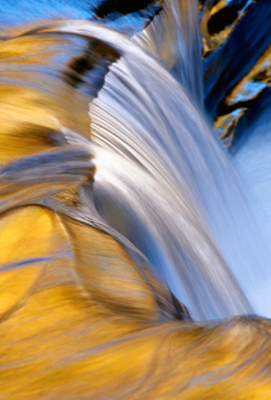 |
August 2012
Use light bouncing into small shaded areas of streams to produce colorful, minimalistic images. Golden Current Last month I discussed how to use bright light bouncing into large shaded areas of streams to produce a landscape image called, Gold on the Little River. This month I am describing how to produce more impressionistic style images by moving in close and using small shaded areas of streams. When making these images I like to move in tight with a telephoto lens and isolate on a specific area that contains interesting reflections from light bouncing off foliage, canyon walls, or direct light from the sky. Small shaded areas along waterways, with interesting light, are difficult to recognize. These small areas are much more common in and around streams than are larger shaded areas. Upon locating a shaded area I try to move around and observe the play of light as it reflects off of the water. I move right, then left, then up and then down, etc. Sometimes I am working with a tiny pool of water and at other times I may be dealing with a small cascade or a section of a waterfall. After finding an aesthetic view point I try to isolate the specific area and light that attracted me. Usually a telephoto lens is needed for isolating and composing. For images involving reflections I often photograph without a polarizer. This gives me a faster shutter speed and more reflected light. On other occasions, I try photographing both with and without a polarizer. I can then judge the different effects of polarization through my viewfinder. I always bracket exposures widely when photographing these kinds of images In my example photograph I used a telephoto lens zoomed to about 250 mm and did not use a polarizer. The essence of the image is the curl of relatively white water as it rolls out of and away from the golden current. The golden color was provided by light reflecting from the canopies of yellow leafed trees. The blue color is the result of reflected light from a blue sky. I used slide film, which captured the image exactly as I had viewed it.
|  | July 2012
Bounce Light into Shaded Areas can Help in Photographing Streams on Sunny Days
Gold on the Little RiverGenerally I avoid photographing streams on bright sunny days. However, sometimes there are ways of producing stunning stream images when encountering bright light conditions. On these kinds of days I search for shaded areas in a stream where bright color is being reflected. The bright colors are usually the result of sunlight bouncing off of colorful vegetation and then being reflected down into shaded water. The walls of a gorge can sometimes provide the surface for reflecting light. The light from a blue sky may directly reflect off of the water in the shaded areas adding intense blue colors. The patterns of colorful light can be used to produce unique abstracts in the small shaded areas or, if you are fortunate enough to have large shaded spaces can be used as part of a landscape. These shaded areas, whether large or small, are easy to overlook so you will need to really concentrate on searching for them. Once you locate a shaded area you need to study the reflected light and make sure there are no extreme bright areas (hot spots) within the frame of your photograph. Direct light, except possibly from a blue sky, will usually overpower the reflected light providing too much contrast in the image. Reflected light bouncing off foliage, tree canopies, and/or gorge walls can produce the same kind of vivid color as bounce light in the shaded canyons of the Southwest. My example image is Gold on the Little River. Because the shaded area was large the reflections worked well in a landscape. The image was made on a sunny autumn day in the Great Smoky Mountains National Park.
| 
Limbs over Hemlock Lake | April 2012
Reflections can Contribute to Creative Foregrounds Limbs over Hemlock Lake In each of the last two “Tips of the Month” I have written about two versions of an early morning image using dramatic cloud patterns at Hemlock Lake. This month I am showing another approach in making an early morning image at the same location. It was taken two days later and from a position only a few feet away from where the two previous images were obtained. The foreground in the photograph Limbs over Hemlock Lake is two branches of a tree silhouetted against the sky complimented by the reflection of one of the branches silhouetted against the reflection of the sky in the water. Because the real branches and the reflected branch have similar density against their brighter backgrounds, it takes a moment for the viewer to recognize real branches from the reflected one. This mini mystery is enhanced by the similar pattern of smaller branches at the end of the limbs. Because of the strong graphic nature of the “three” limbs, they tend to move strongly forward from their brighter, more muted sky backgrounds. A feeling of both depth and creativity is communicated because the reflected and real portions of the foreground separate well from their backgrounds. A tiny bit of mystery is also generated by the viewer’s brief confusion between real and reflected limbs.
|  | March 2012
Power of Minimilization
Cloud over Hemlock Lake (cropped)Good photographs, particularly landscapes, often contain high quality smaller component images within the photograph. This phenomenon is sometimes referred to as “images within images”. Moving in tighter and isolating one of these subgroup images can often significantly change the drama and emotional feeling of a photograph. Ideally, this cropping is done in-camera at the photographic site by using a longer lens or by physically moving in closer to the isolated subject matter. Often we don’t recognize the power of the isolated image while we are taking the initial photograph. Later, when proofing the whole image, we may then realize that a certain section of that image contains the real essence of what we are trying to communicate. Hopefully, in those instances, there is enough information contained in that cropped portion of the overall image to produce a quality photograph. An isolated section of last month’s photo tip image is used to illustrate the “Power of Minimization” in this month’s tip. By moving in tighter and full framing the cloud and its reflection, a totally different emotion is created. Instead of the peaceful harmonious feeling of last month’s scene, a more dramatic feeling is now produced. Using a horizontal composition to emphasize serenity last month, and a vertical composition to emphasize this month’s more dramatic higher impact, but less peaceful image enhances the different emotions communicated by both final photographs.
|  | March 2012
Simplistic Landscapes
Cloud over Hemlock LakeWhen I was leading a group of photographers to a sunrise shoot at Hemlock Lake, we were blessed with wonderful early light and a picturesque cloud cover. Even though the overall cloud patterns were beautiful, one particular cloud and its equally dominant reflection stood out dramatically from the rest of the clouds. Using a very wide angle 17mm lens and a polarizing filter, I positioned the cloud and its reflection about two-thirds of the way across the frame of the image. I also tried to balance the amount of space allotted for the sky with its reflection in the calm lake. The very wide angle lens helped to emphasize the radiating patterns of the clouds in both the sky and in its reflection. The dominant subject is clearly the cloud and its reflection. However, its placement in the colorful setting of first light on the calm lake communicates a peaceful feeling. Using a horizontal/landscape orientation for the image further enhances this serenity.
While making this image I kept thinking of Georgia O’Keeffe’s beautifully simplistic landscapes. “I found I could say things with color and shapes that I
couldn't say any other way - things I had no words for.” Georgia O'Keeffe
|  | February 2012
Make the Journey as Enjoyable and Productive as the Destination
Trail to Crabtree FallsWhen hiking to and from a specific photographic destination, be observant and stop to photograph the happenings along the way. Don't just stop to smell the roses. Photograph the Roses!!! Enjoy the journey and trust your senses. The best images of the trip may well be those that you take along the way and not at your destination area. Enjoy the journey as well as the targeted location. Sometimes I try to time a certain kind of light or weather condition for the planned photographic location. In those instances I usually need to move rather directly to my target area. Even then, while I may not photograph on the walk in, I always try to be very observant and take note of photographic spots that I wish to check on the return hike. Sometimes I leave trail markers, like some small branches or a pile of rocks, to designate these areas. At my planned destination I take time working my dream site to hopefully achieve sought after dream images. After seemingly exhausting the photographic opportunities at my target location, I rather leisurely start my return hike. It is then that I seriously check-out the previously spotted photographic possibilities and look for new ones. Because I am facing in a different direction on the return trip, new viewpoints and different angles become apparent. I try to leave about sixty percent of my total hiking and photography time for photographing on the return hike. My example image is titled Trail to Crabtree Falls. It was actually made on my return hike from Crabtree Falls. Although the foggy conditions seem almost identical and its location is about two miles from the site of last month's tip of the month Fog at Crabtree Meadows, the images were actually made five years apart. |  | January 2012
Great Light can give Excellent Images in Mundane Locations Fog at Crabtree Meadows Several years ago, while leading a photo tour along the Blue Ridge Parkway (BRP) in Virginia, low clouds moved in and wonderful foggy conditions were created. Outdoor photographers realize that fog produces one of nature's most beautiful lighting oportunities. Therefore, we immediately started taking images in the fog at overlooks, picnic areas, and in the BRP campground at Crabtree Meadows. I decided to photograph groups of trees in an open grassy area in the middle of the campground. Fortunately, it was early in the tourist season so there were very few campers and visitors present. The fog undulated frequently between light and heavy. During one of the lighter fog periods I noticed that a campground restroom was conspicuously present in one of my favorite compositions. My initial reaction was not positive. Who wants to take images of a restroom in a campground? Even worse, who would ever purchase such an image? However, upon further observation, it became apparent that when the fog was thick the restroom took on a rather rustic appearance and mysteriously blended softly into the background. I liked the effect, and during periods of heavier fog I continued to include the restroom in my compositions. By overexposing the image by 2.5 stops on slide film I was able to create a water color quality with varying degrees of detail showing in the grasses and trunks of the trees. I like to significantly overexposure my fog images because it creates a light and bright feeling. A couple of my students coined this effect as "Happy Fog". The lesson learned is that great light enables a photographer to create excellent images even in very mundane locations that may contain unappealing subject matter. My example image is titled Fog at Crabtree Meadows.
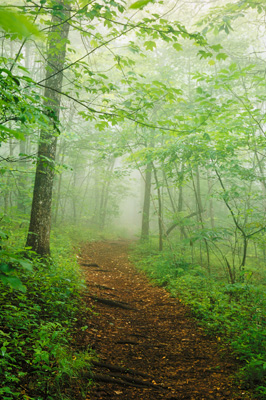
| 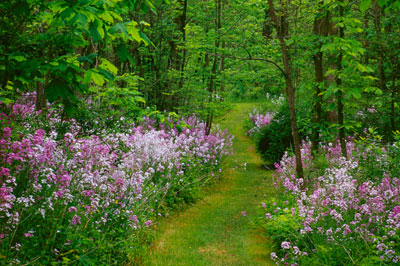 | December 2011
Make Accurate Observations and Keep Careful Records on Photo Trips
Woodland Path
Make good observations and keep careful records (dates, times, locations, comments, etc.) of all your outdoor photography ventures. By consulting these records you will save much time and be able to make good plans for productive return photography trips. I like to photograph in Letchworth State Park around Memorial Day and during the first week of June. Over the years I have noted that Dame's Rockets flowers seem to blossom in several areas of the park during that time period. They usually peak for about a week so I try to plan at least one trip into Letchworth during that time. Knowing that I will generally do some work with the Dame's Rockets and because there are many water falls and cascades in Letchworth, I usually study the weather predictions and try to be there on a rainy or overcast day when there is little wind. These are the conditions that I seek when photographing these subjects. By taking many of these Spring Letchworth trips, over time I have been able to make many good images of the Dame's Rockets in very nice woodland settings. My example image is titled Woodland Path and was taken on one of those Letchworth ventures. You may find it helpful for your planning to note that my records over the years indicate that Spring in the Rochester area seems to be occurring about one week earlier and that our Autumn foliage seems to be peaking about 10-12 days later than twenty years ago. Phyllis and I have found it necessary to schedule our photo trips about a week earlier in the Spring in order to correctly time the blossoming of Rhododendron along the Blue Ridge Parkway. Similarly we have had to move our trips to northern New England one week later in order to effectively time the peaking of the Autumn foliage. Accurate observations and good record keeping, over time, will enable you to make good adjustments in scheduling your photo ventures. Some websites that offer to provide information on the status of the Spring blooms and Fall foliage are good, unfortunately many seem to be more interested in promoting tourism than providing accurate information.
|  | November 2011
Your Clothing and Footwear are Photo Gear Too
Reflection at Hidden Falls
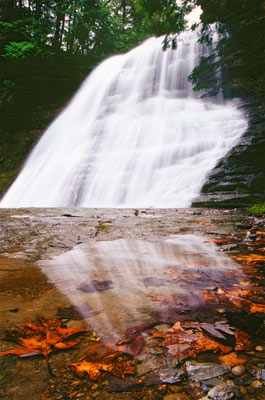
As photographers, in addition to our lenses and cameras, we have other gear such as camera bags, lens pouches, cable releases, tripods, and various other devices associated with digital photography. To work effectively in the field it is important to be as comfortable as possible when exposed to the elements of adverse weather and that is why experienced outdoor photographers consider footwear and clothing to also be important components of their photography gear. In the northern U.S. a good pair of comfortable waterproof boots are a must as well as a good quality rain parka and rain pants. Preferably the rain gear should be made of wind and waterproof fabric that is also breathable, like many of the Gore-Tex and similar materials. Hats and gloves are also important. When a photographer is comfortably dressed for the elements it is much easier to concentrate on being creative while making images. Obviously the clothing must address the needs for the location and it follows that the typical clothing needed for desert regions will be different from tropical, arctic, and rainy temperate regions, etc. By dressing in layers and then removing or adding layers one can control temperature for body comfort. While photographing on a cold, rainy, Spring day in Stony Brook State Park I concentrated on making images of a waterfall. My first few attempts produced pleasant traditional images of the falls. Feeling the need to develop a more unique view of the falls I started surveying the scene for something that might provide some additional punch or interest for the images. I noticed some puddles on a ledge near the base of the falls and found that if I got down real low I could see nice reflections of the falls. I decided to use a puddle that contained leaves from the previous Autumn and concentrated on using the reflection in that puddle to create a more dramatic and unique foreground for my image. To obtain a significant reflection I needed to literally lie down on the wet rocks in another puddle in order to compose the overall image. I have entitled the print as Reflection at Hidden Falls. I doubt if it would have even occurred to me to lay down in the water to take the image if I hadn't been wearing a good quality rain parka and rain pants. | 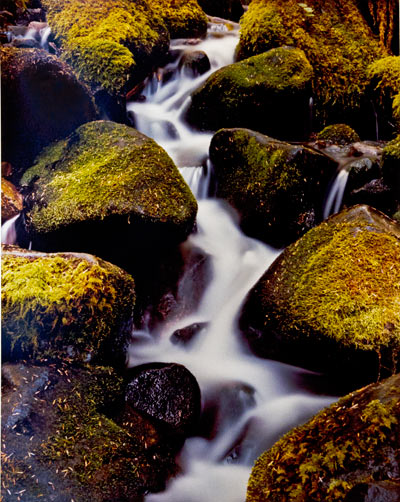 | September 2011
Soft Light on a Bright Sunny Day?
Mossy Cascade The soft light of a cloudy day is excellent for many types of photography. But, how can a photographer find soft diffused light on a bright sunny day? If one is doing macro work with wild flowers a diffusion tent can be used or perhaps the use of white umbrellas will work. HoweveMossyr, what can be done if you wish to photograph a stream or a water falls? Normally I like to photograph these subjects in the rain or more preferably directly after a rain. Even without the wetness of rain, the soft light of an overcast day is often sufficient for making good images of streams and water falls. On a photo tour that we were leading to the Olympic National Park we hiked the famous Sol Duc Trail and attempted to photograph the Sol Duc River, its tributaries, and its waterfalls. Because the day turned out to be very bright and sunny we realized that the contrast between the dark and brightly lit areas in our images was too great for making good photographs. The weather prediction for the next day was for another bright and sunny day. We were quite disappointed and thought that we would not be able to obtain any really good images along the Sol Duc trail. I suggested that on the next morning we might be able to hike in very early in the morning before the sun rose high enough to penetrate the forest canopy and be able to enjoy a short period of time with soft diffused lighting. The group bought into the idea and we each selected a location and planned how we could compose and photograph that area on the next day. The next morning we reached the Sol Duc trailhead well before sunrise and began hiking the trail during the morning dusk. By the time we reached our planned destinations the light was good but still soft and even. We were able to enjoy about thirty minutes of soft even lighting and all of us were able to make a few high quality images. My example image is titled Mossy Cascade and because the light was so even I was able to make straight prints of the image without any burning or dodging. With today's digital photography and the techniques of tone mapping and HDR, photographers enjoy a much greater latitude in working with light contrasts. However, when possible it is still best to work with optimum lighting for the type of subject you are photographing. | 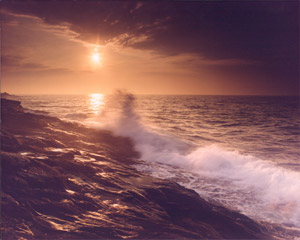 | August 2011
Photographing Ocean Waves
The Wave of Pemaquid An enjoyable and creative way to shoot ocean sunrises and sunsets is to find an area where large waves crash and splash across a rocky foreground. One such area is Pemaquid Point on the Maine coast where the summer sun can be used to outline ocean waves as they crash against eastern sloping rocks. When preparing to make these kinds of images, spend some time exploring different angles to find the best spots from which to silhouette breaking waves. This means that you will generally be using backlighting of the waves and rocks as your subject matter. Make sure that you select a safe spot for you and your equipment and avoid getting any ocean salt spray on your camera or lens. Once you have determined your shooting spot, study and time the pattern of the waves for many minutes. Bracket both your exposures and shutter speeds in order to obtain the best images. I like to shoot with speeds of 1/250 through 1/500 of a second. An advantage of the sun providing backlighting is that your exposure can be quite fast without needing to adjust your ISO. Because the bright sun will create a dark image when using a normal matrix meter reading, I like to overexpose this kind of image by bracketing between +1 and +2.5 stops (again with a matrix meter reading). Check your histograms for the best exposures with your digital camera. HDR techniques might or might not work because of the motion of the waves. To help diminish lens flare I use only one filter and that would likely be an 81A warming filter. I don't use a polarizer for these kinds of images as they increase the risk of lens flare and will slow the shutter speeds too much. If there are clouds present and you can sunburst the sun, problems of lens flare will be reduced and mood and interest will be added to your images. To enhance a sunburst and provide some depth of field, I use as small an aperture as I can that still provides a fast shutter speed. A long lens of 100-400 mm will enable you to isolate and aesthetically compose your subject. A long lens will also help to keep you and your equipment at a safe distance from the ocean. Check your equipment frequently, and clean your camera, lens, and tripod after shooting near the ocean. My example image is titled The Wave of Pemaquid. It was captured with slide film and I printed it from an interneg in a traditional wet chemistry darkroom with considerable burning and dodging. |  | June 2011
Be Patient with Sunrises
Golden Tree Sunrise at Great BendWhen you have paid the psychological price of getting up at an ungodly hour to pursue a well planned sunrise shoot and nothing positive seems to be happening, be patient. It is easy to become discouraged and move prematurely to another location. As I have mentioned in an earlier Photographic Tip, most of my best selling sunrise images are secondary sunrises. That means they are photographed from about 20-75 minutes after the actual scheduled sunrise time. Several years ago I was leading a photo class field trip to Letchworth SP. We arrived before sunrise and a dull cloud covered sky dimmed our hopes of photographing a quality sunrise. Because there wasn't enough light to shoot at other nearby locations we continued to wait out the conditions. Small cloud break-ups in the western sky kept teasing us. These breaks in the clouds needed to move to the eastern sky in order to produce good sunrise lighting. I was feeling guilty about getting my companions up so early for a sunrise that didn't seem to want to happen. The group was getting restless which increased when I recommended that we wait 15 more minutes. About twelve minutes later the "sun gods" answered our patience with one of the most beautiful sunrises that I have ever photographed. The sun lit up the foreground and rim of the canyon. Best of all it backlit the "golden tree". For over a half hour, everyone went into hush mode as they furiously photographed the scene from several view points. Patience along with some good fortune had paid off. The lesson learned was that if we are patient sometimes good things happen. By observing the pattern of the clouds and anticipating their movement we were able to leverage our luck. | 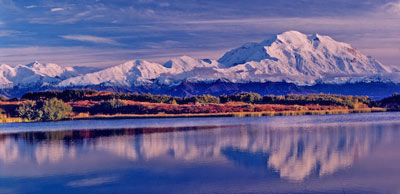 | March 2011
Cropping can help to strengthen an image.
Denali Sunset When editing images, look for opportunities to strengthen composition by cropping the images. Ask yourself, "What is the most relevant subject or compositional area in your image "? Then try various cropping shapes to emphasize that subject matter. Try horizontal, vertical, panoramic, and square shapes to isolate this most important and usually most interesting subject matter. Eliminate negative space and extraneous subject matter and concentrate on what really is important. In other words, use cropping to zoom in on the essence of the image. A good cropping can change an ordinary image into an extraordinary one. My example image, titled Denali Sunset, was taken in Alaska's Denali National Park. I made the original image on 6x7 medium format film. When printing in the darkroom I used the full width of the negative but cut about 1/6th of the image off the bottom and approximately another 1/6th of the image from the top. This left the middle 2/3rds of the image for the resulting panoramic print. Try to do your cropping with your camera and lenses when you are making images. The best option is to capture the essence of the composition in the field by composing and shooting carefully. Panoramas can be achieved in the field if you are shooting digitally by taking several overlapping adjacent images and using a stitching program. However, the last opportunity to strengthen composition and/or salvage some images is cropping. Therefore, I always consider cropping when doing the final editing prior to printing.
|  | February 2011
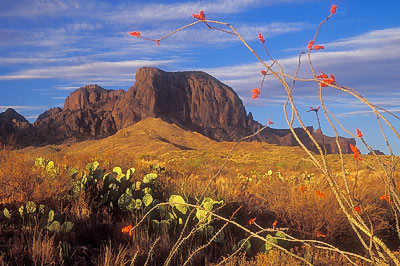
Framing can be an Aesthetic form of Foreground
Ocotillo at Panther Junction The use off foreground has been previously discussed in earlier tips of the month as a means of creating the perception of depth in images. Framing is a form of foreground that partially or sometimes fully surrounds the subject matter of an image. It is a phrase that we learn early in our development as photographers. The components of the framing are usually closer to the photographer than the subject matter and the framing is usually rendered sharp in the image. Like other kinds of foreground, its use can create the feeling of depth in images. Sharp foregrounds which include framing enable the viewer to feel as if they can step into the image. The viewer subconsciously remembers experiences related to the composition of the image and the emotions of that experience are communicated. Thus, the use of framing and other forms of foreground are one of the most effective ways for photographers to communicate feelings to viewers of images. My example is a secondary sunrise image where I have combined a blooming ocotillo cactus and prickly pear cactus to frame (surround) the Chisos Mountains in Big Bend National Park in Texas. Both cacti were brightly lit with side-front lighting about 30 minutes after sunrise. The brightness of the cacti helps them to jump forward in the image. The darker peaks of the Chisos Mountains recede into the background. The title of the image is Ocotillo at Panther Junction. The entire scene is rendered sharp by using a 28 mm lens with a small aperture of f/22 and focusing on one of the closest stems of the ocotillo. A polarizing filter helped saturate the colors.
|  | January 2011
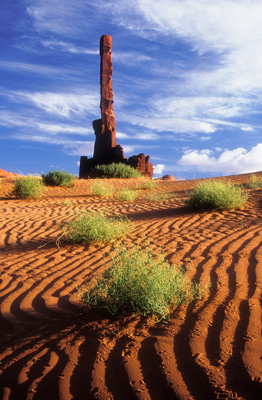
Shadows from Side Lighting - to make Dramatic Images
Sand Ripples at the Totem Pole Strong side lighting can produce deep shadows and provide excellent lighting for making dramatic images. The side lighting that occurs just after sunrise and just before sunset produces the longest and deepest shadows for that day. These shadows can totally change a mundane ordinary landscape into a truly extraordinary landscape. Side lighting also maximizes the effects of using a polarizing filter. Glare is reduced and colors become more saturated when a polarizer is used. The combination of deep shadows and saturated colors can be used very effectively to produce powerful imagery. My example image entitled Sand Ripples at the Totem Pole was made just before sunset in Monument Valley. At this time of day the deep shadows in the troughs of the ripples contrasted beautifully with the brightly lit peaks of the sand ripples. In capturing this image I moved to a position where the shadow lines would act as lead in lines to the Totem Poles. I also manuvered my tripod and camera to distribute the green tumbleweeds aesthetically. By observng the length of the shadows produced by the tumbleweed plants you can get a feeling for how low the sun was in the sky. A few minutes after making this image the sun went below the horizion and the drama of the scene was lost.
|  | January 2011
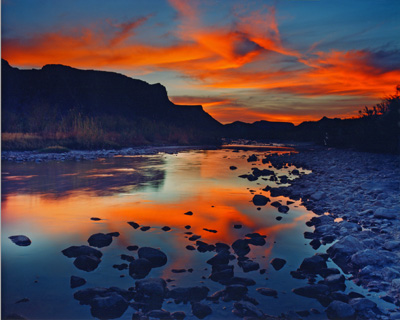
Be Aware of Lighting Changes when using Manual Metering
Contrabando Sunset Phyllis and I were photographing along the Rio Grande River in the Big Bend State Park of Texas one April evening in anticipation of a beautiful sunset. The clouds were magnificent and we eagerly awaited what promised to be a gorgeous sunset. I was so confident that I set up two tripods. I placed my 35 mm camera on one and my medium format Pentax 6x7 camera on the other. With my 35 mm camera I used aperture priority exposure and with my Pentax camera I exposed manually. In both cases I used a small aperture to maximize depth of field. Initially, when the sun first dropped below the background mountains the sky became surprisingly and disappointingly dull. Eventually warm colors began to present themselves. The sky then gradually evolved into one of the richest red sunsets that I have ever witnessed. Throughout this transition the colors seemed to become richer and brighter. My aperture priority meter readings with my 35 mm camera of course adjusted accordingly. I suddenly realized that I needed to start monitoring my manual meter readings with the Pentax camera more carefully. I quickly adjusted my exposures with the Pentax camera. To my surprise, the sky became increasingly brighter after the sun had set. In fact, after the sun had receded below the horizon, the sky continued to brighten by a solid half stop of exposure. After awhile the sunset took on a normal pattern of gradually diminishing brightness. This is the only time that I have ever experienced an actual brightening of the sky after the sun had slid below the horizon. Often the sky will become more colorful but I had not expected the light to become brighter after the sun had set. The lesson learned is that when using manual metering it is important to monitor exposures carefully and often, even when the intensity of light might not seem to be changing.
|  | December 2010
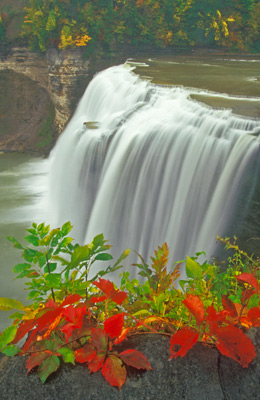
Bright Objects Move Forward and Dark Objects Recede
Virginia Creeper at the Middle Falls Brightly lit objects tend to project forward in images while dark objects tend to recede. Therefore, when making images it is effective to use brightly lit subject matter in foregrounds and to use darker colored areas as background. This can create the feeling of depth in our images. Portrait photographers provide good lighting for their subjects and often use dimly lit backgrounds. Macro photographers use good lighting on their subjects while utilizing darker shadow areas for their backgrounds. Wedding photographers pose brightly clothed groups of people in front of darker backgrounds. Landscape photographers use brightly lit foregrounds in front of darker middle and backgrounds. In each of these examples the photographer communicates depth by making their subject matter pop forward while their backgrounds recede. In my example image, that I title Vriginia Creeper at the Middle Falls taken at Letchworth State Park, my basic subject matter was the falls. Fortunately the background cliffs of the other side of the river were dark, and the natural light of the scene produced good separation between the bright falls and the darker cliff background. The challenge then became to find a foreground that could separate from the brightly lit middle ground falls. In working the scene I searched for a colorful, brightly lit foreground that could project forward and create some contrast and depth separation from the falls. Fortunately, I was able to find some bright red leaves of Virginia Creeper amongst some other well lit green leaves. I then composed the image using the Virginia Creeper as foreground, the falls as the middle ground, and the cliffs as background. Another alternative could have been to use a silhouette type of foreground in front of the falls, but I believe that in this instance the brightly lit foreground provides a better perception of depth and therefore more effectively communicates my feelings when I was making the image.
|  | November 2010
Be Ready to Move Quickly and Adjust
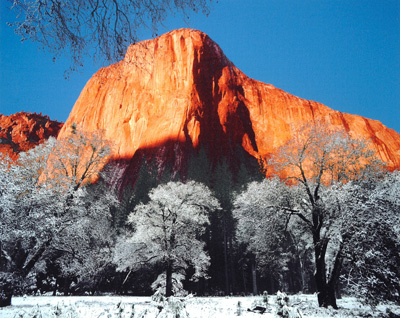
Winter Sunset on El Capitan On the last day of a Winter trip to Yosemite National Park I was totally engrossed in photographing delicate snow patterns on trees in a shaded area of Yosemite Valley. For some reason I turned around and was stunned by the beauty of light striking the cliffs of El Capitan and its nearby trees approximately 180 degrees from where I was shooting. I quickly packed up my equipment and, pumped with adrenalin, I jogged across the valley meadow. I set up my tripod about 100 yards from a group of trees in front of El Capitan and began shooting images with my 35 mm camera. As the sun dipped behind me, shadows began to cover the trees and move towards the cliffs. Recognizing that the sunlight was rapidly being replaced by shadows, I switched to my medium format Pentax 67 camera. By then the shadows were moving rapidly up the cliffs of El Capitan. I squeezed in several bracketed images before the cliffs became completely enveloped in shade. I felt very fortunate to have glanced behind me earlier to see what was happening on the northeast cliffs of the valley. I was equally fortunate for having moved quickly across the valley to capture images of El Capitan and then making the adjustment to medium format in time to capture the scene with great light. I have often become so involved in shooting 35 mm that I don't think to start photographing with my medium format camera until the quality of light has diminished. Being ready, moving quickly and making a last minute adjustment allowed me to capture my favorite image of a week long trip. My example image is entitled Winter Sunset on El Capitan. It was very interesting for me to experience the phenomena of a sunset where the light seemed to move upward instead of having a sun sink lower in the sky until it drops below the horizon. | 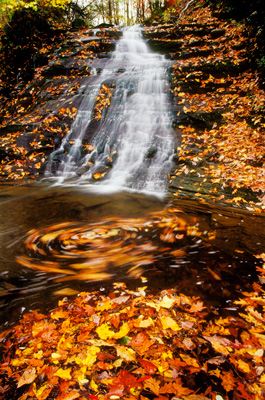 | October 2010
Photographing Whirlpools in Streams
Whirlpool at Mystery Falls In a previous tip of the month I wrote about capturing the romantic feeling of water falls by "cotton candying" the white flow of water. Another romantic motion of fast flowing streams is that of a whirlpool. For many years I have sought the right lighting and stream conditions for photographing a scene featuring a whirlpool in a natural setting. It would seem that a whirlpool in a photogenic scene would be fairly easy to find. For me that has not been the case. For starters there needs to be considerable rain over a few days in order to produce whirlpool creating conditions. I looked for a whirlpool that would show pleasant colors in its circles in addition to just white motion. It was also important for me to capture that kind of whirlpool in an attractive natural environment. Additionally, I sought soft diffused lighting and hoped to be able to shoot the image in the rain or very shortly thereafter. Every year I concentrated my search during the peak foliage time of Autumn because it provided the best probability for finding these conditions. The peak foliage window time is about three weeks per year. Two Autumns ago while photographing with two friends in Letchworth State Park I found all of my needed conditions. While trying to control my excitement, I spent over an hour working various views of a whirlpool in the plunge basin of a water falls near the ghost town of Gibsonville. To provide time for pleasant slurring of the whirlpool I used a polarizer and stopped my aperture down to f-22. For correct exposure I bracketed around a central meter reading of 1.5 stops of over exposure. With the low light and shooting at 100 ISO I was able to shoot four to six second shutter speeds. I couldn't find the official name of this water falls, probably because it is rather intermittent with good flows in only the Spring and Fall seasons after substantial rains. My example image is entitled Whirlpool at Mystery Falls.
|  | September 2010
Make Road Images
Greenbrier Highway Wherever I travel, roads, pathways, and trails interest me and provide good subject matter for photography. Successful images of roadways involve communicating an invitation to move into the image and travel along the road or pathway. To accomplish this the photographer needs to look for good lighting and then some inviting lines leading into the image. Both conditions prevailed one Autumn while I was photographing in the Greenbrier section of the Great Smoky Mountains National Park. The lighting was soft and diffused after a morning rain and the narrow serpentine dirt road contained an attractive series of "S" curves as it meandered back into a hardwood forest. Because this narrow two-way road is the only road through this area of the park I entitled my example image The Greenbrier Highway. In making this image I used my zoom lens at about 135 mm at f-16 in order to compress the distance and maintain image sharpness down the road. This mild telephoto focal length also enhanced the series of "S" curves. Roads, pathways, and trails are some of the most sought after images in the Stock Photography business.
|  | August 2010
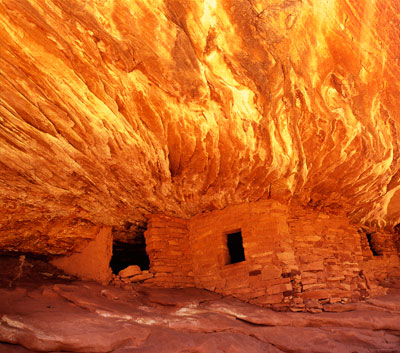
Reflected Light in the Southwest
House on Fire While photographing in Arizona and Utah during the last few years I have learned to see light differently. My most successful images from the Southwest have been made by using reflected light. The direct light striking desert sandstone is, except for sunrise and sunset conditions, generally far too harsh to make good images. However, when the photographer is able to concentrate on making images of shaded sandstone which has been gently lit by light reflected directly off of another sandstone surface the results can be very dramatic and colorful. Direct sunlight striking one surface and then being reflected into a shaded area creates the perfect conditions for producing stunning and colorful images. Under these circumstances the light that is recorded on the film or sensor has been reflected twice and therefore colors have been intensified twice. The results can be so colorfully surreal that they may seem unbelievable. My example image entitled House on Fire was photographed using the light reflected off of the brightly lit canyon wall behind me into the totally shaded alcove containing the ruin. My camera recorded the reflected light off of the ruin and the shaded wall area above. When I first approached the ruin, the flame like patterns were not obvious. It initially looked like just another mundane shaded area of rock around a ruin. It was only after studying the subtle lighting that I began to see the patterns and visualize the possibilities. When making images with reflected light be sure to bracket your exposures. My best image for capturing the intensity and color of the flame patterns was under exposed by a half stop. Also, be sure to not include any direct lighting as it will radically blow out areas of the image and be very distracting.
|  | July 2010
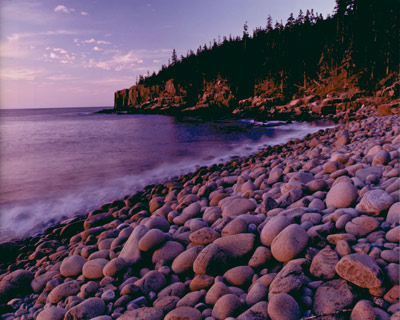
Don't Be Afraid to Get Your Feet Wet
Bubbles of Jordan Pond Over the years I have been trying to make images at Jordan Pond, in Acadia NP, Maine by using rounded foreground rocks to echo the rounded mounds of the two dominant mountains called "the Bubbles". On most of those attempts I struggled to maintain my balance while straddling other rocks in order to secure a position for achieving good composition. In most instances I ended up in unbalanced, precarious and contorted positions. This uncomfortable state detracted from my ability to concentrate on positioning my tripod and camera in order to properly compose an image. My hiking boots were usually too low to walk in the water, and when I went barefoot, being a tenderfoot, I invariable cut up my feet. In July of 2008 I solved the problem by purchasing a pair of wading sandals. The sandals enabled me to easily walk around in the water with good stability. I was then able to comfortably maneuver my photographic equipment and experiment with different image compositions. The sandals are now part of my regular equipment whenever I do lake or stream photography. They work great in Spring, Summer and up to mid-Autumn. The ability to comfortably move around in the water opens up more perspectives for finding different positions to make creative images. It gives the sandaled photographer an advantage over other photographers who are restricted to terra firma. My example image is entitled The Bubbles of Jordan Pond.
|  | June 2010
Using the Total Fog Perspective
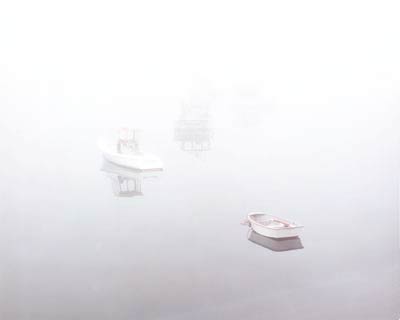
Boats in Fog Last month I wrote about using Lupines in a foreground with a fog enshrouded harbor as a background. I called this the 2-F perspective - Fog and Foreground. This month I would like to introduce the "Total Fog Perspective." Total Fog images are those where the subject is completely immersed in fog. To capture Total Fog images I often use my 100-400 lens, locked on a heavy tripod, use mirror lock-up with a cable release, and then scan a heavy fog scene for interesting subject matter. I try to isolate interesting subjects that are totally immersed in the fog. The fog will have varying effects on subjects that are at different distances away. Close objects will be sharper than farther away objects. As the distance becomes greater objects increasingly become softer and more muted. The different densities of fog create a feeling of depth. Commercial fog filters and the old fashioned method of blowing hot moist breathe over the front of a cold lens generally don't work because they render all parts of an image equally soft throughout, thereby losing depth perception. Mother Nature's fog is the only really natural looking "fog filter". In this month's example image entitled Boats in the Fog I photographed the scene about fifteen minutes after last month's Tip of the Month picture. My subject matter is a group of boats positioned in the fog at different distances away. How many boats are present? If you said four, you are good. If you counted five you are really, really good. If you counted six you have an excellent imagination or you have found a new boat. I overexpose fog images by about 1.5 stops using matrix metering and bracket a half stop each way. Total Fog images tend to be very artistic, moody and mysterious, whereas 2F images tend to be more dramatic, moody in a different way, and with a better feel for depth. When you have the great light of a foggy day shoot many images using both perspectives. | 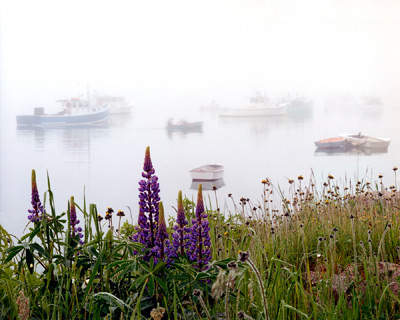 | May 2010May 2010
Utilizing the 2-F's
Lupines and Boats in the Fog One of my favorite times to photograph outdoors is on foggy days. I like to use a perspective that involves the phenomena of what I call the 2-F's. One F represents foreground and the other F is fog. Combining the two creates the 2-F perspective. My most successful images using the 2-F concept occur when I am able to find particularly interesting subject matter that I can use as foreground against a foggy landscape. I move in tight on the foreground making it a large and dynamic portion of the image. Often my lens is only 8-10 inches from the foreground. In order to render the entire foreground sharp I usually stop down to an aperture of f-16 or f-22. I can occasionally use f-11, or even f-8, if I'm working with a very wide-angle lens. There is some flexibility with the selection of aperture because the fog naturally increases the softness of the scene and reduces depth of field naturally. The combination of sharp foreground and muted background creates an interesting contrast within the image, and a feeling of depth and mystery are communicated. My example image ends up with two subjects and no middle ground which would not normally be a recipe for success. However, it seems to work. Many say that the foreground lupines in this image are the more dominant subject. I do not disagree. Lupines and Boats in the Fog was captured at Stonington Harbor, Maine just a little after sunrise when there was little wind. Using matrix metering I over exposed the scene by about 1.5 stops. This kept the fog bright and cheerful and provided good exposure for the lupines and greenery. |  | April 2010
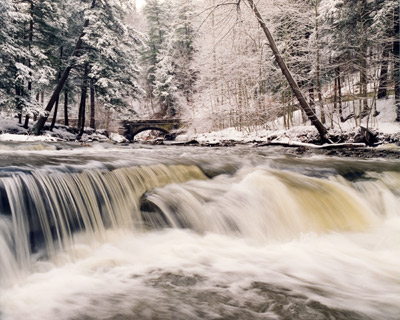
Photograph Water Falls on Rainy Days
Falls on Thompson Brook
Many photographers put away their cameras on rainy days, therefore, missing the best conditions and the most beautiful lighting for photographing water falls. The soft lighting of overcast days along with the darkening effect of water on rocks and vegetation are ideal for obtaining high quality images of streams and water falls. The range of light intensity is reduced and a good exposure can produce details in both the highlight and shadow areas. Another advantage of shooting water falls on rainy days is that the accompanying soft subdued light enables the photographer to use slow shutter speeds to slur the motion of the moving water. This "cotton candy effect" can communicate a romantic feeling. I generally use a polarizing filter to reduce the glare on the wet, shiny surfaces and to help saturate colors. In addition, the polarizer slows down the shutter speed thus slurring the water further. When you photograph in the rain, relax, slow down, work patiently, and talk to yourself. Proceed deliberately, step by step, and protect your equipment from the rain. This will be hard work, and you will shoot fewer photographs, however your productivity will be high. My example image was photographed at the second falls on Thompson Brook in Pinkham Notch located in the White Mountains of New Hampshire. It was taken just after a steady rain had stopped. This is the best condition of all since it has all of the benefits of shooting in the rain but, little of the hassle of working carefully under umbrellas.
|  | March 2010
Befriend the Local Folks
Rain Pools at Cathedral Rocks A few years ago while photographing the Cathedral Rocks near Oak Creek Crossing in Sedona, Arizona I was unceremoniously evicted from an area that I had mistaken for public land. On the hike back to my van I met a woman who was about to enter the trail from which I had been removed. I alerted her that she was about to enter an area that was private land. She laughed and said that everyone walked down that trail to the creek. Upon realizing that I was a photographer she offered to lead me to a little known picturesque plateau that was on public BLM land. So, I trudged along a pleasant wooded trail with the woman and her dog named Blue. After about a half mile the path dropped steeply to a redstone plateau with a gorgeous view of the Cathedral Rocks. After expressing my thanks to the woman and petting my new friend Blue, I began surveying the landscape for a good orientation to capture this wonderful scene. The rain pools were fascinating so I ultimately settled down low on the ground at a pool with a prickly pear cactus. The late horizontal light just prior to sunset provided a warm ambience and long shadows for the scene. A great foreground, clear reflections, a beautiful subject and magic light - what else could I hope for? The moral of the story or in this case the "Tip of the Month" is to interact with people in a friendly manner. You will find it pleasurable and sometimes beneficial. Local folks really enjoy sharing their special places with people whom they believe will understand and appreciate their favorite locations.
|  | February 2010
When editing your images, disregard how easy or difficult they were to capture
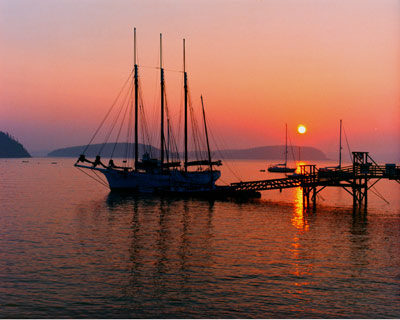
The Margaret Todd at Sunrise A trapping to which photographers often succumb is overvaluing images that were difficult to obtain, and undervaluing images that were easy to acquire. If one hikes four miles back into a canyon, takes two hours shooting many different images from precarious vantage points of a water fall, and then hikes the four miles back out of the canyon in a rain storm, there is a likelihood that the images obtained are going to be over rated by the photographer. Conversely, if a photographer is able to jump out of his or her vehicle and take a couple quick images of something, there is a definite tendency to undervalue these images because they were so easy to obtain. The reality is that other people will evaluate an image by its quality, totally independent of its history of capture. Therefore, it is important when editing your work to disregard how easy or difficult it was to capture images. Photographs need to be evaluated based on their quality as a product without regard to their history of acquisition. My example image of the Margaret Todd Schooner in Bar Harbor, ME was easy to capture and I initially undervalued it. Friends and customers encouraged me to print it. I did so and it has sold well.
|  | January 2010
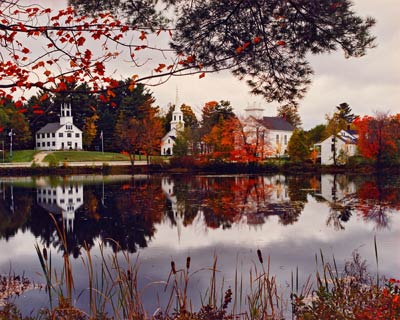
Visit the Bookstores of Unfamiliar Areas
Churches of Marlowe When on location in an unfamiliar area travel photographers can save a lot of time by browsing bookstores, libraries and news stands and by studying the work of local photographers. This diminishes the amount of time needed to drive around randomly searching for good photographic locations. I usually start by studying the post cards and then migrate to travel and photography books of the area. The visiting photographer then has some definite locations to consider visiting. Modern GPS instruments and detailed maps such as state DeLorme Gazetteers work well in helping to find these prime photographic locations. I enjoy learning and studying successful classical landscapes and then trying to improve images from these areas. This generally means that the lighting must be better in some way and/or I need to find a creative new perspective for capturing the ambience of the location. After working the more obvious viewpoints of a locale I often spend an hour or two trying to discover new ways of viewing the area as well as looking for smaller isolated images within the larger images. This is when one can find interesting ground cover, reflections, flowers, abstracts, etc.. Several years ago when we were traveling home from Maine I found a picturesque post card of the town of Marlowe, NH. We located the town with our Delorme Gazetteer and changed our driving route enabling us to photograph the town in late afternoon light. Realizing that our favorite view of the town would benefit from morning light we camped overnight and then drove back to Marlowe before sunrise the next morning. To our surprise Marlowe and its ponds were in deep fog. We initially enjoyed shooting mood images with the sun trying to break through the fog. When the fog lifted we were able to shoot the reflections of the Churches of Marlowe with soft front lighting. Without noticing the post card of Marlowe and adjusting our route home we would not have obtained this image nor several other images we captured in the Marlowe area.
|  | December 2009
Simulating Depth in Semi-Abstracts
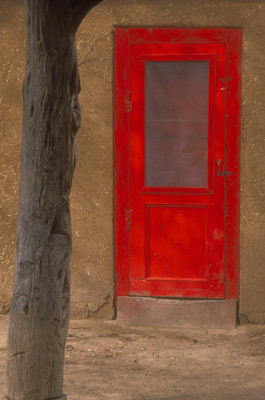
The Red Door of Taos While photographing a red door in Taos Pueblo, NM, I noticed a brown post off to my left. The post was supporting a roof like structure over the doorway. Realizing that I was using a traditional two dimensional perspective which would come across quite planar, I moved back away from the door and reframed my image to include the post. A longer lens was needed to maintain the door's perceived size and to keep it's strategic position one-third over and one-third down in the frame. By including the post I was able to create a better feeling of depth as compared to shooting the door in isolation. It was important to leave a little space on the left of the post to provide balance and to enhance the feeling of the third dimension. I focused on the side of the post and stopped the aperture down to f-22 to insure sharpness throughout the image. Though it is good to strive for minimalization, sometimes it is desirable to include a foreground or framing element to simulate depth even in a semi-abstract or isolation image.
|  | November 2009
Secondary Sunrises
Autumn Sunburst at Great Bend I categorize my sunrise images basically into three categories Pre-Sunrise, Sunrise, and Secondary Sunrises. A Secondary Sunrise means the image is captured about fifteen minutes to an hour after the sun actually breaks the horizon. During that time there is often very dramatic light with long shadows. Side and back lighting through or on clouds, trees, vegetation, buildings, and other structures can add to the drama. Most of my successful sunrise images, particularly my exhibiting ones, are actually Secondary Sunrises. My example image was taken about forty minutes after sunrise. Using a small aperture, f-22, I was able to burst the sun's rays as they pierced the leaf canopy. I particularly liked the way the very early light bathed the tree trunks, rocks, and leaves on the right side and in the foreground of the image. The lighting is tricky under these conditions so I bracketed my exposure from minus a third of a stop through one stop over exposure. Another benefit of the small aperture is that it produced a large depth of field enabling good sharpness throughout the image. A nice feature of a Secondary Sunrise is that if you are late for the actual sunrise you sometimes get a wonderful second chance. | 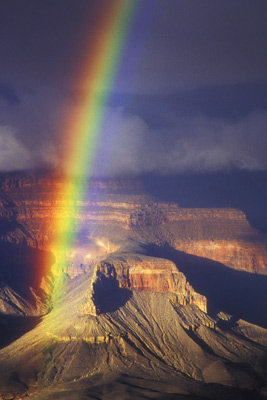 |
October 2009
Rainbow Images
Grand Rainbow
There is a tendency when shooting rainbows to use wide - ultra wide angle lenses in order to capture the entire arc of a rainbow. This, however, reduces the size of the components of a landscape and generally diminishes the impact of the scene. The rainbow colors themselves are rendered thin and distant in the image. In order to better capture and thicken the spectrum colors of the rainbow and to increase impact I like to use a long lens and emphasize the rainbow against a prominent subject in a landscape. A couple of years back I was photographing the Grand Canyon during a rainstorm when suddenly a beautiful rainbow developed. My first reaction was to use a wide angle lens and to include the entire arch and as much of the Grand Canyon under the colorful arc as possible. When I looked through my viewfinder it became apparent that I was not capturing the magnitude nor the magnificence of the rainbow or the canyon. It suddenly occurred to me that I should include only a section of both that seemed to have particularly good lighting. I quickly changed my wide angle lens for my 100-400 mm zoom lens and ultimately zoomed it out to a 400 mm focal length. I knew instantly that this created a much more powerful way to capture the beauty and magnificence of both the rainbow and canyon. I carefully recorded the image with my camera locked securely on a solid tripod using full polarization, mirror lock-up, and a cable release. Using a long lens and isolating a portion of the rainbow and landscape minimized the component elements but maximized their impact.
| 
 | September 2009
Shoot the Seasons
Photos Spring Sunrise at Great Bend and
Autumn Sunrise at Great Bend
When you find a good photo location that you enjoy visiting, as expressed in an earlier tip of the month, revisit, revisit, & revisit until you become intimate with that location. Then really have some fun by intentionally using these revisitations to capture the nuances of the different seasons. There are few places equal to upstate New York for enjoying four distinct photogenic seasons. Our Springs are refreshingly beautiful. Our Summers are lush and green. Our Autumns can be vividly colorful, and our winters can be delicately white and pristine. To top off the varying seasons is the fact that the weather and lighting will almost always be different. We in the Rochester area really live in an outdoor photographer's paradise.
The Great Bend area of the Genesee River in Letchworth State Park has always fascinated me. I began shooting the "S" curves of the river from many vantage points several years ago. One of my favorite positions utilizes two trees for framing the sides of an image used in harmony with a slanted rim foreground. When the light is right I have been able to capture some excellent images at this location. One Spring, during the last week of April, light bathed a row of trillium lining the cliff's edge and I was able to record an early morning image. Motivated by my Spring success, I returned several times during that year's Fall season and on one day was fortunate to catch fog in the canyon during peak foliage with soft diffused lighting. I often exhibit these two images side by side and both have sold well. On a few occasions they have been purchased as a pair. I have been working on a winter image at this location but will never quite be able to achieve the same perspective because the wonderful "Tree of Character" on the right of the frame has recently fallen into the gorge. I have lost a true friend. I entitled the two images Spring Sunrise at Great Bend and similarly Autumn Sunrise at Great Bend.
|  | August 2009
Double Exposure
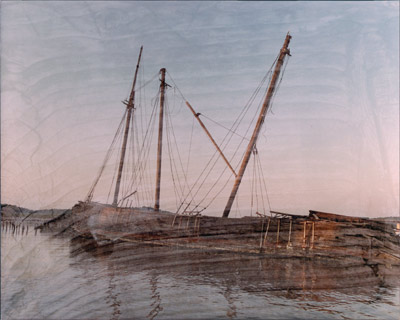
Photo Ghost Ships of Wiscasset I have often said it is the quality of light that initially motivates me to take a photograph. However, sometimes the light is quite ordinary and I find an interesting subject that begs to be captured photographically. Even though I might feel an emotional attachment to a subject, shooting under the conditions of ordinary light generally produces an ordinary image. A technique I learned years ago from an excellent photographer, Doug Shumacher, is to capture the ambiance of a subject by taking a double exposure. Use one exposure to provide motion or emotion and the other exposure to capture the essence of the subject matter. One hazy, lazy day of summer I was hoping to photograph the old somewhat decrepit schooners marooned in the waters of the Sheepscot River, near Wiscasset, Maine. A look at the schooners and it was obvious that they had survived beyond their practical usefulness. Even though they were well grounded onto the bottom of the river, their masts and bodies protruded high above the surface of the water. Their rough, rustic appearance indicated that they had participated fully in history. To subtlely capture the mystery element of the schooners, I first took a macro image of an aesthetic section of wood grain, under exposing it by 1.33 stops below my camera's recommended meter reading. For the second image on the same frame of film, I recomposed a general landscape image that included the schooners, and used an exposure of 0.67 stops under the recommended meter reading. The two under exposures add up to one full exposure, but not evenly. The result is that the wood grain of the first image lightly and mystically flows over the more discernable scene of the schooners. I titled the image Ghost Ships of Wiscasset. A year or two later the two ships in reality became ghosts as they were destroyed in an act of vandalism. Some of the newer digital cameras are capable of shooting in-camera multiple exposures. If your camera does not have this capability, you can use Photoshop or other programs to derive a similar multiple exposure effect. | 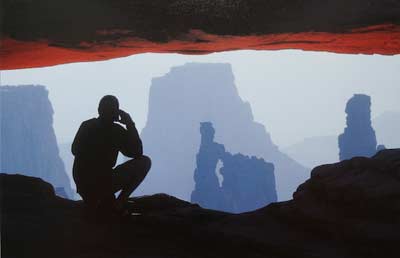 | August 2009
Shooting the Classics
Photo Silhouettes at Mesa Arch
Some photographers avoid shooting well-known classic location landscapes. I personally like the challenge of shooting such images. These are the among the most difficult scenes to capture since so many people have seen the classic version of that particular location. In order to be successful you have to benefit from perhaps the most dramatic light that ever bathed that landscape or in some way show it in a new creative manner.
Mesa Arch has become an icon of the American Southwest and as such is now a location that is sought out by most serious nature photographers who travel to that area. In my example image entitled Silhouettes at Mesa Arch, I was attempting to magnify and silhouette the Washer Woman Arch along with three other mesas while still framing it under the wonderful red glow of Mesa Arch. To accomplish this I moved back about 40 yards from the normal spot used by photographers and selected a 100-400 mm telephoto lens zooming it to about 300 mm. I shot several bracketed images with different viewpoints while a Swiss hiker patiently waited for me to finish shooting. He finally asked my permission to move up into the arch to take a couple quick images with his point and shoot camera. I urged him to do so feeling guilty about how long he had politely waited. As he crouched to take a rather traditional image with his camera zoomed to wide angle, I observed that his silhouette balanced the Washer Woman and the other background mesas rather nicely. I asked him to remain perfectly still, and while he patiently obliged, I shot several bracketed images. The combination of using an unusual focal length lens and the inclusion of a human silhouette enabled me to capture this unique image of a classic view. Can you find the "Washer Woman Arch" in the image? Would you believe it is about two miles from "Mesa Arch"?
It bothers me when some photographers down grade the classic locations as cliché spots. The reality is that these photographers have generally not worked these areas creatively to produce original images.
|  | July 2009
Be Flexible
Photo Sunrise at Abrams's Creek Last month I wrote about the importance of pre-planning particularly for sunrise shoots. This month I would like to caution against being too focused on your plan. If on the way to a planned shoot location you catch yourself yelling, WOW!!, you should pay attention to your senses. "WOWs", usually mean you are on to something special. These occurrences should be treated as unplanned opportunities that need to be investigated. A few years ago Phyllis and I were camped near the entrance to Cade's Cove in the Great Smoky Mountains National Park. Preplanning had placed us almost directly at the entrance, poised to enter the cove (high mountain valley) at first light the next morning. On that next morning, while making the short drive to the cove's entrance, we observed a picturesque stream with wonderful backlit silky fog. We were "WOWED", and fortunately adjusted our plans, and began photographing this beautiful stream intending to take a few minutes to record it's moody atmosphere. An hour and a half later, after shooting about a hundred images, we were still captivated by the scene. First light in Cade's Cove was postponed to the next day. My example image is entitled "Abram's Creek". Recent news from Kodak makes it ironic that this month's photo tip was recorded on Kodachrome slide film.
|  | June 2009
Plan Ahead
Photo Sunrise at Pemaquid Point II
In photography and in life in general, it is useful to be organized and to plan ahead. This is especially true for sunrise photography. I try to pre-run my sunrise shoots so that I know the day before exactly where I want to initially place my tripod the next morning. Even after driving to the image location I am usually still a little groggy from the required ungodly wake up time. It is therefore somewhat comforting to be able to set up my tripod in a good location without any deep thinking and with minimal stumbling around in the dark.
My example image is a June sunrise at Pemaquid Point, ME which required a rude 3:00 AM wake up. I had previously planned where to place my tripod, so all I initially needed to do was to safely negotiate my passage through the rocks to my pre-planned position. Even the passage through the rocks had been pre-planned and practiced the day before. When the sky began to glow and the sun rose, my adrenalin increased and I could then begin thinking more clearly and creatively. For the next hour and a half it was exciting to move around trying to capture the varying moods created by the warm sunlight and the long shadows it produced.
|  | May 2009
Revisit, Revisit, Revisit
Photo Round Rock at Otter Cliffs
One of the strategies used by master landscape photographers is to visit and then continually revisit locations that resonate with them. Every visitations serves to increase understanding of the location and how light affects the scenery. With each visit the photographer further develops intimacy with the surroundings. By observing, analyzing, and trying new approaches the photographer improves his or her ability to capture the moods of the locale. Variables such as lighting, weather, and seasonal conditions, provide the photographer with tools to communicate ambiance and different moods of the scene.
In my example image Round Rocks at Otter Cliffs, it took me 13 sunrise visits over a three year period to capture the warm red glow on the egg shaped foreground rocks. The rocks are normally almost bone white. On the 13th sunrise a beautiful red glow painted the rocks for about three minutes and I was rewarded for my persistence.
|  | April 2009
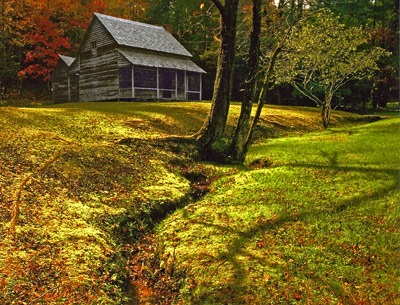
Study the Scene before Entering
Photo Cabin in the Woods by Phyllis Thompson I have often advised students to study the scene before racing off to shoot it. Here is an example with the photograph Cabin in the Woods taken by my wife and fellow photographer, Phyllis. When Phyllis and I were leading a photo tour to the Great Smoky Mountains National Park, we drove by a picturesque cabin in Cades Cove. After parking, we jumped out of our vans and all of us, except Phyllis, moved quickly into the wooded areas to each side of the cabin. Our intent was to use leaf canopies and other wooded elements as foreground in shooting side and angle views of the cabin. Phyllis studied the scene from near the road and observed the subtle echoing "s" curved lines of an above ground root, a winding stream, and an echoing shadow. She combined them to create a wonderful foreground that covers about 70 percent of her overall frame. Phyllis placed the cabin slightly off center in the background to complete her landscape. Soft sunlight touched the grass areas to render interest and a pleasant mood for the viewer. We all captured good images of the cabin, however, Phyllis' image was by far the most creative and aesthetically pleasing. The lesson to be learned is to "survey and study the scene before entering."
|  | March 2009
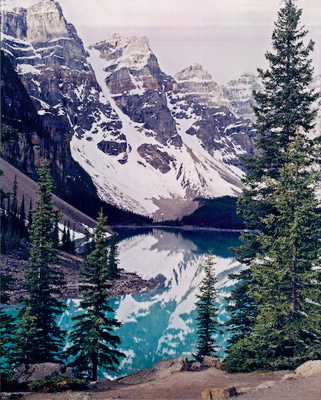
Reflection in a Landscape
Photo Moraine LakeThe use of reflections when composing images is always fun to do. You can utilize this technique with any kind of lighting. By moving lower or higher, or by moving left or right you can change the perspective and introduce unusual and creative versions of an image. In my example image of Moraine Lake in the Canadian Rockies I didn't have any spectacular lighting. However, the soft diffused lighting of a cloudy day worked well to even out the intensity of highlight and shadowed areas. This, in combination with a perfectly calm day, produced optimum conditions for capturing the mountain reflections in the still of Moraine Lake. I took quite a bit of time moving around in order to find a pleasant and balanced foreground that would contribute the perspective of depth for the overall image. Fortunately the wind remained minimal and the lighting consistent. Moraine Lake is nestled beautifully in what is called the "Valley of the Ten Peaks". In this image you can see four of the valley's ten peaks.
|  | February 2009
Winter Photography
Photo Winter at Wolf Creek
The snows of Winter cover the scars of the landscape and sometimes create picturesque scenes. When a fresh snow falls I love to get out early in the morning and drive to some natural area. Along the way I try to recognize potential image capturing scenes. Winter fog, hoarfrost, and snow clinging to the branchs of trees all provide excellent subject matter and/or supporting ingredients for interesting compositions.
One Saturday morning, I awoke to a beautiful fresh snowfall and as soon as I could, I drove hurriedly to Letchworth State Park. I rapidly hiked down a trail from outside of the park to one of my favorite locations, Wolf Creek Glen. Knowing that the sun would soon melt the pristine snow clinging to the branches, I worked quickly to record many bracketed images. After about a half hour, the sun's rays began to melt the snow on the tree branches and the magic of the scene diminished.
While driving home, I allowed my cameras to warm by leaving my bag open in the back seat. Upon arriving back at the house I realized that the cameras and their attached lenses were still quite cold. Therefore, I placed them in freezer bags, zipped up the bags, and then brought them into the house where I let them set for a couple of hours before opening the Ziploc bags. This was done to enable the cameras to warm gradually while preventing condensation from forming on the cold camera surfaces. I highly recommend this procedure whenever you shoot outdoors at temperatures below freezing. | 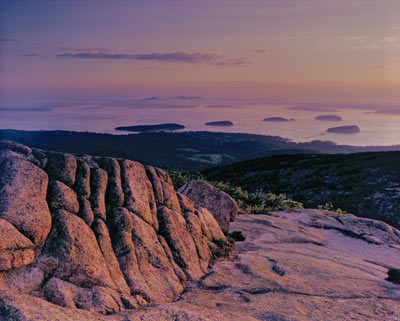 | January 2009
Side Lighting at Sunrise or Sunset In the two previous tips of the month I wrote about avoiding lens flare when shooting sunrises and sunsets by "sunbursting" the sun with foreground and by being aware of the 180 degree view. Another very useful technique when photographing sunrises and sunsets is to use side lighting. In other words, don't shoot directly into the sun but utilize sunlight coming from the side. This kind of light can be quite dramatic with long shadows. I have found that by placing the sun anywhere from 45 to 135 degrees from the axis of my lens works well. Be sure to use your lens hood and be aware of lens flare, particularly if the angle is between 45 and 90 degrees. I usually use a polarizing filter because it will have maximum affect with side lighting. In "Sunrise over Bar Harbor", I took the photo about two minutes after the sun broke the horizon at about a 60 degree angle from the axis of my lens. The wonderful warm, glowing light bouncing from the foreground rocks lasted for about two minutes. Although most of the magic light dissipated quickly, I was able to shoot many other high-quality images for about 90 minutes utilizing side lighting and polarization. After that, Phyllis and I treated ourselves to an exquisite breakfast at the Café This-A-Way in Bar Harbor. This is our ritual reward for rising so early for sunrises.
| 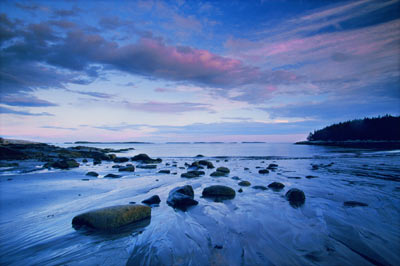 | December 2008
180 Degree Sunrises and Sunsets Most of us have a tendency to shoot sunrises and sunsets directly into the sun. Although this can be very productive, especially if there are interesting back lit clouds, an alert photographer will remember to observe lighting conditions in all directions. Turn your back to the sun every once in a while and look 180 degrees from the rising or setting sun. Sometimes you will see beautifully front lit clouds and dramatic front lit subject matter. My example image was taken at Birch Point State Park in Maine. There was a wonderful sunset in the west but I couldn't find interesting subject matter in that direction. It started to rain and I turned to the east and was astonished to find colorful clouds and a rainbow. I immediately turned my cameras to the east and began photographing. My rainbow images were good, but my example image with radiating clouds and rock patterns is my favorite. The blue color results from the reflection of the blue sky on the wet sand and rocks.
|  | November 2008
Sunbursting Sunrises and Sunsets One of the main obstacles in shooting directly into the sun during sunrises and sunsets is that lens flare is almost certain to occur. To counteract this, I sometimes sunburst the sun against a silhouetted subject. I step down my aperture to f-22 and rather precisely position my tripod and camera so that only a tiny sliver of the sun is showing. A tiny sliver is about 1/50th or 1/100th of the sun. Any larger amount of sun will almost certainly produce lens flare. To check on lens flare and the sunburst itself I push in my depth-of-field button to observe the effects of the f-22 aperture. In my example image, I used a sunburst to capture my rendition of the often photographed Mesa Arch. Note that the image was taken about 20 minutes after sunrise but, because of the sunburst, still communicates the feeling of sunrise. The large difference in light intensity of the sunrise and the back and underside of the arch made it necessary for me to bracket my exposures widely. I generally avoid using a polarizer when shooting into the sun as it usually has no effect and increases the probability for lens flare.
|  | October 2009
Painting with Snow Flakes
Snow storms present opportunities to create "painterly" effects in winter scenes. These effects are best achieved when the storm has large, fluffy, floating snow flakes. I like to freeze, figuratively speaking, the snow flakes against a dark background by using relatively fast shutter speeds like 1/125 second if possible. Usually this means that I have to sacrifice the depth of field by using large apertures. The short depth of field is generally not a problem in that most of the image will be muted anyway by the snow flakes frozen in space. If you use slower shutter speeds like 1/30 second or if the storm is driven by strong winds, the result will not be painterly, but will look more like a rain storm. The example rural landscape, entitled "Winter Windmill", was taken in Staunton, VA during a heavy snow storm.
|  | September 2009
"S" Curves
"S" curves in streams, rocks, trails, roadways, and wherever present provide excellent compositional possibilities. Some say the "S" curve is naturally sensual. I'm not sure, but I do know that when used in an image it can be very pleasant. My example image is of "Sleepy Hollow Farm" formerly called "Gray's Farm". It is located in the back country of Vermont a few miles north of Woodstock. The sweeping portion of the "S" curve provided by the driveway is not only pleasing, but also leads the eye smoothly down into the image and ultimately to the rustic barn. In this instance even a portion of a full "S: curve is effective. The heavy rain from the fallout of a July hurricane enhanced the ambiance and moodiness of this composition.
| 
Bubbles | August 2008
How to deal with Photo Block Occasionally photographers experience "photo block" like writer's develop "writer's block". On those hopefully rare occasions I like to dramatically change my photographic strategy. If working a landscape with fairly normal lenses and little success I might try an extreme wide angle lens (~ 15 mm) and make the foreground about 75 percent of the image. Another approach might be to take a 400 mm lens and isolate on only one small but interesting portion of the landscape. Sometimes I will try in camera multiple exposures. When shooting my example image I was leading a group of photographers on Rialto Beach in Olympic National Park on a rainy and dreary day. Nothing seemed to have interest to me. As the leader of the group I needed to put up a good front and to be enthusiastic. I happened to notice some interesting sea foam bubbles along the water's edge. Quickly I replaced my normal zoom lens with a macro lens and went in very close to the sea bubbles. In the macro mode I was able to see colors and reflections that I had not initially seen. I first noticed the strong triangular lines reflected from my tripod. A huge rather ugly blob in the center of the triangle turned out to be my body's reflection. In order to break up the blob I threw my arms over my head into a "touchdown" signal and took several bracketed images using my two second shutter delay. I shot almost a roll of film with about 50 percent of the images being quite good. Amazingly, this has been a good selling image. Two of the images were independently purchased by women whose boy friends were sky divers. | 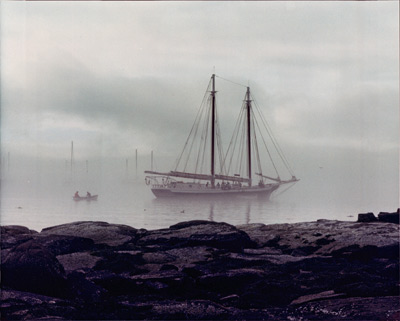
Schooner and the Rowboat
| July 2008
Be alert for the Magic Moment When taking photographs be alert for the "magic moment". If time and light allows, I try to patiently work an image to determine the best composition. During that time I take a few shots in case the light or part of the composition changes. While working the scene try to anticipate changes before they occur. Scan the sky to see if light changes are likely to happen and be aware of movement within the composition. In the case of my example image, "Schooner and the Rowboat", I had taken several images of the schooner using the rocks as foreground. Suddenly I noticed two men in a dinghy rowing out towards the schooner. Hoping that they would actually approach the schooner, I waited until they reached a complementary position before taking the image. My images of the "schooner" with foreground rocks were actually quite good, but the image with the addition of the men in the dinghy has been one of my all time best selling prints. | 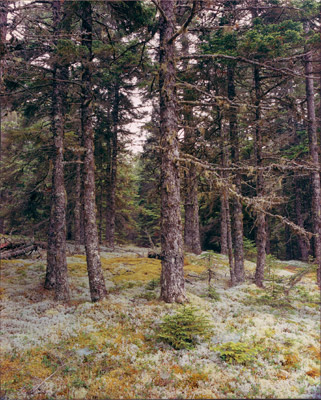
Mossy Forest
| July 2008
"Blah Day" Photography On "blah" lighting days I love to go to forested areas. The soft, diffused, subtle, lighting of cloudy overcast days is wonderful for leveling the light intensities of shadows and highlights. When using evaluative or matrix metering on these kinds of days, the camera's recommended reading for a "right on exposure" is usually quite good. The accompanying image of a forested area on Deer Island, Maine was taken on one of those dreary "blah" lighting days. On a bright sunny day this scene might be quite beautiful to the human eye, however the resulting print would probably have much too much contrast. | 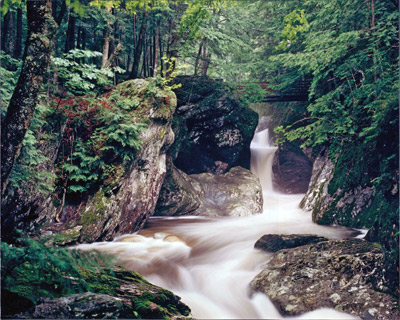
Texas Falls
| June 2008
Bad Weather Means Good Photography David Muench has a saying that, "Bad Weather means Good Photography". I have found this to be very true. Some of the best sunrises and sunsets occur when strong storms begin to clear. This image of Texas Falls in Vermont was taken during a heavy rainstorm which was part of the fall-out of a July hurricane. I used 400 ISO print film in my Pentax 6x7 camera with a polarizing filter to capture this scene. At F/16 my shutter speed was four seconds. I call this a "Two Umbrella Shot" - one over my camera & tripod and the other over my camera bag. I wore a waterproof parka, rain pants, and hiking boots. In these kinds of severe conditions you can get great images if you are prepared, stay calm, take your time and work carefully. I always bring rain gear and two umbrellas on my photo journeys. "Rain can be beautiful"! |
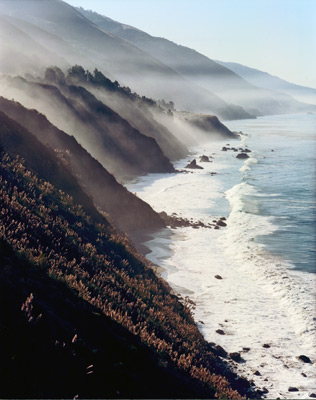
Early Morning at Big Sur
| May 2008
Fog and Haze can Create Mood
Just as foreground can be used to create the impression of 3D character, fog and haze can also be used to produce this perception. By creating the feeling of depth the viewer identifies with the landscape and remembers past experiences associated with similar scenes. These experiences trigger feelings and mood is communicated. | 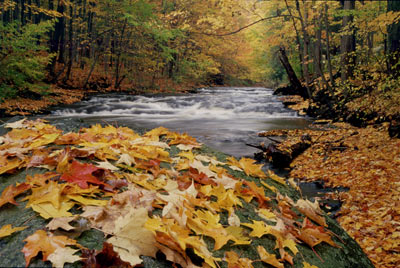
Autumn Leaves at Beaver Meadow Creek
| April 2008
Foreground Creates Mood Arguably the most important compositional factor in dramatic landscapes is the use of foreground. By including strong foregrounds, the impression of 3D character can be created. When the viewer perceives depth they feel like they can step into the image. This triggers subconscious memories of things like: the fragrance of foreground flowers, the granular texture of foreground rocks, the fresh cool moisture of dew, or the warm feeling of sunlight scintillating across rocks. These triggered remembrances cause emotional responses and communicate mood. | 
Wave of Zion
| March 2008
Watch for Interesting PatternsIn composing images, look for repeating patterns and/or shapes. This repetition is called "echoing" and can be very pleasant to the viewer. In the image, "Wave of Zion", there are three areas of echoing: foreground, middle ground, and sky. Notice that the curved lines within each area are not only parallel but also have radiating character.
| 
Winter at the Hogback
| February 2008
Winter Snow PhotographyMost of us as photographers, when using exposures recommended by our camera's meter, have taken disappointing images of picturesque snow-filled, winter scenes. These images are generally too dark and sometimes appear bluish or grayish. To capture the pristine whites of a beautiful snow scene when using matrix, evaluative, or overall metering, overexpose the image by one full stop and bracket your images by a half stop over and above that exposure. In other words, expose images containing significant amounts of snow by +0.5, +1.0, and +1.5 stops above your camera's recommended settings. Photographers shooting digitally should also check their histograms to insure that the exposure is well balanced and that you have not overexposed too much so that highlight details have been lost.
| 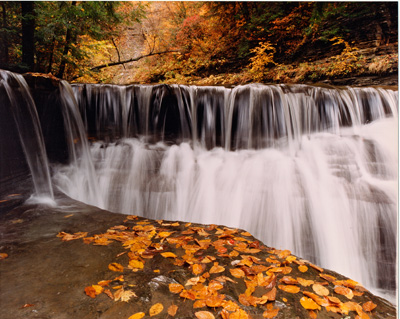
Fall Cascade at Stony Brook
| January 2008
Keep it Simple
This is sometimes referred to as the KISS concept. After you finish taking a photograph, but before you move your camera, ask yourself what first attracted you to shoot this image. Then move in physically or zoom in tight on that component of the image that first attracted you. Chances are that the resulting image which isolates the attraction will be more powerful and communicative than the original image that contained more information. Most photographers try to include too much information. Remember in photography more is generally less. |
|